Invoicing
Streamline Your Billing with Easy-to-Use Invoicing Tools
Invoice Homepage
Accessing Invoicing
To access Invoicing, click the “Invoicing” option from the side bar of the web dashboard.
Option 1 PDF Invoice
To access the PDF version of an invoice, locate the action tab for the desired invoice line item and select the paper icon.
Option 2 Remind Customers of Invoice(s)
To send a reminder to a customer to pay an invoice, locate the action tab for the desired invoice and select the bell icon. Select either the email or phone number and click the “Submit” button to send the reminder to the customer.
Option 3 Edit an Invoice
To edit an invoice, locate the action tab for the desired invoice and select the pencil icon. From here you can edit invoice information.
Option 4 Pay an Invoice
To pay an invoice, locate the action tab for the desired invoice and select the $ icon. From here you can select the option to pay an invoice.
Option 5 Delete an Invoice
To delete an invoice, locate the action tab for the desired invoice and select the trash can icon. You will recieve a popup to confirm the invoice deletion.
Creating an Invoice
Step 1 Create New Invoice
To create a new invoice, select the button in the top right of the page which says “+ Create Invoice”
Step 2 Customer Information
Option 1 Input New Customer Information
For a new customer, enter the customer email in the “recipient email” section. You may also add other desired information for the customer, but only the email is required for customer information.
Option 2 Input Existing Customer Information
To create an invoice for an existing customer from your customer portal, enter their name, email or phone number and select the search button to the right. In the dropdown select the customer you are creating the invoice for. Once the customer has been selected, all information will be auto-filled provided the information is in your customer portal.
Step 3 Invoice Information
An invoice number will be automatically generated, however you are able to input a custom invoice number if preferred. The invoice date will auto-fill with today’s date.
A due date is required to create an invoice. To add the due date, select the due date box and a calendar will appear where you can select the desired due date for the invoice.
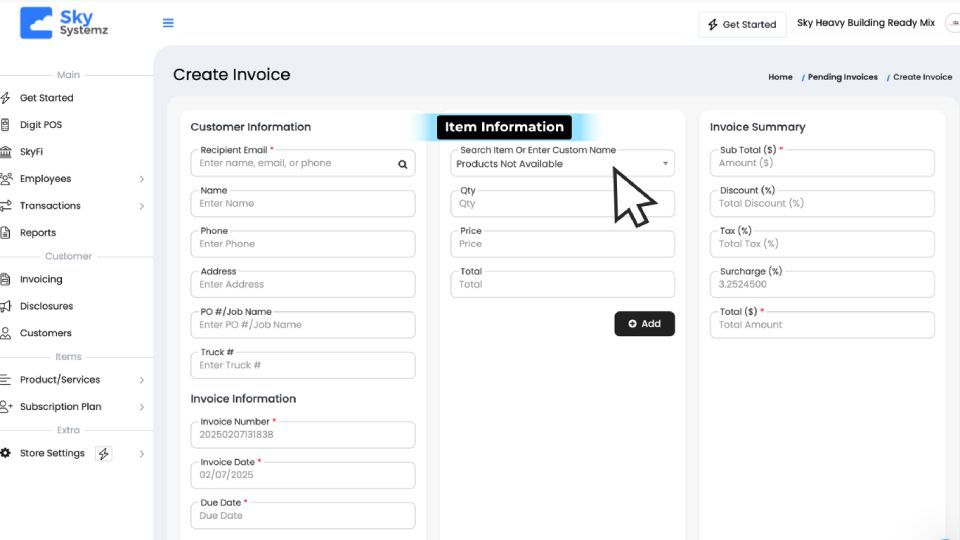
Step 4 Item Information
Option 1 Enter a Custom Item
Step 1 Create Custom Item Name
To enter a custom item, select the dropdown under the “item information” field and type the item name then press enter.
Step 2 Enter Item Quantity and/or Price
Once the item name has been inputted, you can enter the appropriate quantity and price for the item in their respective boxes.
Once the item information has been updated, select add and the item will be added to the line item section of the invoice.
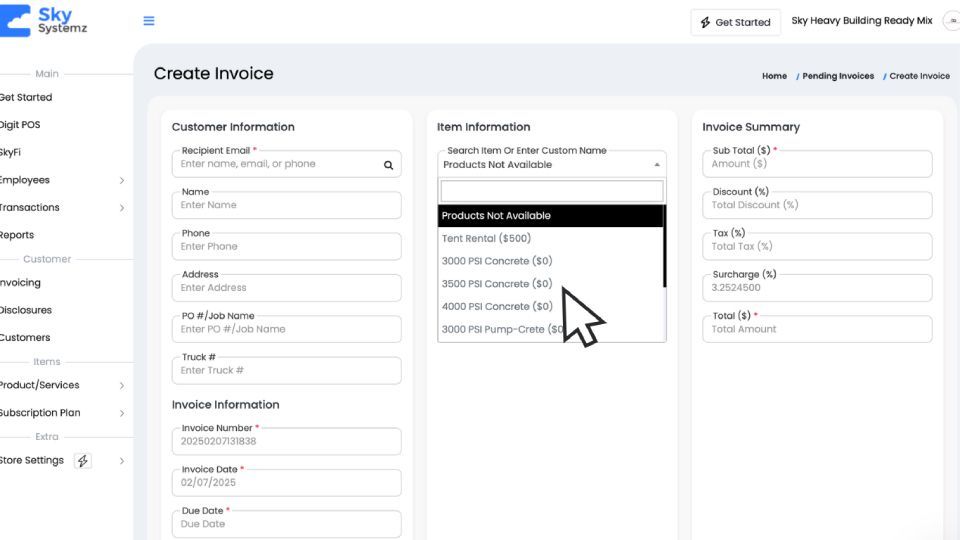
Option 2 Enter an Existing Item
To find an existing item, select the dropdown under the “item information” field and select the item you would like to add to the invoice. You can also start typing and items will be suggested if they have been added to your dashboard.
Step 5 Send Invoice
You have the option to make an invoice tax exempt by selecting “Yes” or “No” under the “Tax Exempt” field.
You have the ability to send the invoice, send as an estimate, or save as a draft. By selecting “Choose File” you can add an existing file from your device.
To send the invoice select the “Send Invoice” button at the bottom of the page.
Merging Invoices
Step 1 Select the Invoices to Merge
To merge multiple invoices you must first select the invoices you would like to merge by selecting the checkbox on the left of the invoice. Note: to merge invoices the selected invoices must be assigned to the same customer name.
Once you have selected the invoices you would like to merge click the “Merge Invoices” button at the top.
Step 2 Select Primary Invoice
Once you have clicked the “Merge Invoices” button you will see a pop-up where the invoices will be listed out. Select the invoice that will be the primary invoice for the others to be merged into. You may then customize the invoice information and select a new due date.
Step 3 Merge the Invoices and Send to Customer
Once you have customized the new invoice select the “Merge” button and you will receive a warning that this action cannot be undone to ensure you wish to continue. The newly merged invoice will be listed within the invoices tab and the customer will receive a new invoice notification.
Take Your Sky Systemz Experience Even Further
Discover more tools that enhance your payment processing and business management. Explore these guides to unlock the full potential of Sky Systemz.
Customer Management
Efficiently manage your customer data, track interactions, and build stronger relationships to enhance your service and drive repeat business.
Transactions
Track, review, and manage all your business transactions in one place, ensuring complete visibility and control over your payment processing.
Disclosures
Learn how to manage and generate necessary disclosures to ensure transparency and compliance in all your business transactions.